Call of Duty
How to unlock the bunker and safe in the Call of Duty Black Ops 6 campaign?
In this guide, we will help you solve the whole process to unlock the bunker and reach the safe that is inside the single-player campaign of Black Ops 6.

‘Call of Duty: Black Ops 6′ is active. If you are one of those who usually tries to finish the campaign before entering the real war in multiplayer, surely there is a part that you have already reached in this mode.
Inside the safehouse you will come across a piano, which will be the start of a whole process that will lead you to discover a series of puzzles inside a bunker. Solving this whole chain will eventually lead you to a safe that will give you $1000, enough money to unlock the gear station and the weapon bank right away. If you want to get to this reward as quickly as possible, or if you’re already stuck, stay with us.
SPOILER WARNING: If you want to enjoy the Call of Duty: Black Ops 6 campaign, you’d better go in completely blind.
The entire process of unlocking the bunker in the Call of Duty: Black Ops 6 campaign
The Piano/Bunker:
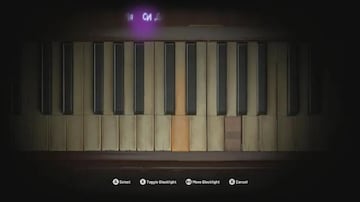
To start the puzzle, go to the room with the piano, where you’ll find a black light by the fireplace. This tool is essential to solving the puzzle, as it will reveal hidden numbers on the walls when it shines in different places. Look for the numbers 1 to 5 followed by a small piano key icon. These indicate the correct order in which to play certain keys on the piano. After identifying the numbered notes, use the black light to confirm the identity of each key on the piano and play them in the following order: Mn, Pe, Cn, Ao, Pe. If done correctly, a door next to you will open, giving you access to a path down to a bunker door. However, before you can proceed, the bunker door will remain locked until you activate a generator in the basement.
Basement Generator:
Once you’re in the basement, locate the generator and follow the instructions on the piece of paper next to it, which details the steps needed to restore power. The sequence you’ll need to follow involves several steps: first, turn the boiler twice to close it, then go to the pilot switch and activate it, open the fuel line by turning it once, and finally return to the boiler to turn it twice to reopen it. If you’ve followed these steps exactly, the game will prevent any further interaction with these components, and you’ll hear the generator come to life. With the generator now running, you’re ready to access the hidden bunker.
Bunker Keypad:
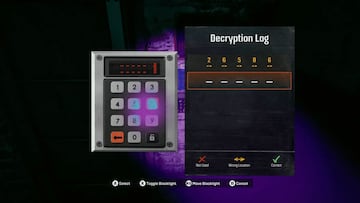
Upon entering the bunker, you’ll find a locked door with a keypad that requires a code. This code is randomly generated, so you’ll have to guess it by trial and error. You’ll get five tries per attempt, and each guess will provide feedback by indicating which numbers are correct, need to be repositioned, or aren’t part of the code at all. Use this feedback to keep the correctly placed numbers, shuffle the yellow-highlighted numbers until they turn green, and disregard any numbers that aren’t used. With some persistence, you’ll unlock the door.
Hack Computer:
In the keyboard room you’ll find a computer that needs to be hacked. Fortunately, the game provides a guided tutorial to help you through the process, making it straightforward. As part of the hacking sequence, you’ll be asked to enter a few keywords. While the words may vary from player to player, they generally relate to the bunker. For example, some sample words might be “HOLDING BUNKER ROOM OPEN”. If you follow the tutorial steps closely, you’ll be able to complete this task easily.
Holding Room:
Once the computer is hacked, go to the holding room, where you’ll have to pick a lock on the door leading to the interrogation room. Inside you’ll find a desk with a key on it, which will be essential for accessing the next area. This part is fairly straightforward and doesn’t require any complex steps beyond locating and obtaining the key.
Radio Code:
In the next section you’ll come to a room with a radio. Follow the instructions to tune it correctly and receive a secret message. This message is unique to each playthrough, so listen carefully. Typically, the message will contain two phrases with specific keywords, such as “broom,” “couch,” or “cereal. Write down each keyword in the order you hear it. Then, using the black light, locate these objects in the room and write down the numbers associated with each object. These numbers, in the order of the keywords, will form the code needed to unlock the safe upstairs in the back bedroom.
Safe Code and Reward:
Using the code from the radio message, head upstairs to the back bedroom where you’ll find a safe. Enter the code you’ve collected to open the safe and claim your reward. This completes the puzzle sequence and you can enjoy the fruits of your labor…. Or of following this guide.
Currently, comments are disabled. We are working on improving this service.